C言語とかの配列を画像として見れる形で保存して表示する簡単な方法
動機
Ray Tracing In One Weekendを見てて思ったのですが、PPMはシンプルな画像フォーマットですが、Windows環境ではビュワーが必要です。プログラムから直接Windowを開いてレンダリング画像を表示することはもちろん可能だと思いますが、コードが環境依存になりやすい方法で、きれいに抽象化するためにはそれなりのライブラリが必要になるかと思います。やはり、何らかの画像ファイルに画像を出力したいですが、テキスト形式のPPMのように簡単なフォーマットで、C++に限らずどの言語でも簡単に実装できて、画像はビュワーをインストールすることなく見れるようなものが望ましいです。こんな方法は何かないかと考えてみました。
PPM
PPMは、これ以上ないほどにシンプルで、どんなプログラミング言語でもテキストファイルを記述できるスキルがあれば、PPMフォーマットの出力プログラムを書くことは簡単です。 一方で、PPMはWindows環境では一般的な画像ファイルフォーマットではないため、出力された画像を見るためには、PPMを扱えるビュワーを別途用意する必要があります。
P3
2 2
255
255 0 0 255 0 0
255 0 0 255 0 0
上記は、2x2ピクセルのPPM画像の例で、先頭のP3がRGBカラー画像であることを示して、次の行の2 2が画像の横と縦の大きさ、次の行の255は画像のRGB各成分の最大値を示し、
その次の行からは、RGBの各色がスペース区切りで記述されます。
HTMLのcanvas要素
上記のPPMファイルの代わりの手法として、HTMLのcanvas要素に、簡単なJavascriptでRGB配列で格納した画像を表示する方法です。 配列の前後に少々テキストが追加されますが、画像の縦と横の幅とピクセルの配列以外は、基本的には固定文字列の記述なので、プログラムとしての複雑さはありません。 配列の可読性もPPMと同レベルといえると思います。そして、出力はHTMLファイルなので、ブラウザを画像ビュワーとして使うことができます。
<!DOCTYPE html>
<html><body>
<canvas id="c1" width=2 height=2></canvas>
<script>
const pixels = [
255, 0, 0, 255,   255, 0, 0, 255,
255, 0, 0, 255,   255, 0, 0, 255,
];
document.getElementById('c1').getContext('2d').putImageData(new ImageData(new Uint8ClampedArray(pixels), 2, 2), 0, 0);
</script>
</body></html>
以下の関数は、C++の関数で、配列を受け取り、HTMLのcanvas要素に画像を表示するHTMLを出力します。 基本的には上記と同様のHTMLを出力しますが、画像の拡大縮小機能と、チャネルごとのマスク機能、それからPNGファイルとして(あらためて)画像を保存するボタンを追加しています。 PPMを出力するよりはコードは長くなりますが、プログラムらしい実装は前半部分に少しあるだけで、後半の部分は固定の文字列を出力しているだけです。C++の関数自体の複雑さは、PPMファイルを出力する関数と大差ありません。他言語への移植も簡単です。 一方で、出力画像はブラウザ上で直接確認でき、実装における環境依存の要素も排除できていると思います。
#include <iostream>
#include <fstream>
#include <iostream>

/**
 * Exports pixel data to a HTML file.
 * @param path The directory path where the HTML file will be saved.
 * @param data A pointer to the pixel data array. The data is expected to be in RGBA (4 elements per pixel) or RGB (3 elements per pixel) format.
 * @param width The width of the image in pixels.
 * @param height The height of the image in pixels.
 * @param alphaEnable If true, the data is treated as RGBA. If false, it is treated as RGB.
 * @param imagefilePath The PNG image file name to be used when the save button is pressed.
 * @return bool Returns true on successful export, false otherwise.
 */
bool ExportPixels(const char* path, const unsigned char* data, size_t width, size_t height, bool alphaEnable = false, const char* imagefilePath = nullptr)
{
	if (width * height == 0) {
		std::cerr << "Error: Empy image: " << path << std::endl;
		return false;
	}
	std::ofstream outFile(path);
	if (!outFile.is_open()) {
		std::cerr << "Error: Could not open the file: " << path << std::endl;
		return false;
	}

	outFile << "<!DOCTYPE html>" << std::endl << "<html><body><script>" << std::endl;

	outFile << "const pixels = [" << std::endl;
	for (size_t y = 0; y < height; ++y) {
		for (size_t x = 0; x < width; ++x) {
			outFile << static_cast<int>(*data++) << ", " << static_cast<int>(*data++) << ", " << static_cast<int>(*data++) << ", ";
			if (alphaEnable)
				outFile << static_cast<int>(*data++) << ", ";
			else
				outFile << "255, ";
		}
		outFile << std::endl;
	}
	outFile << "];" << std::endl;

	outFile << "const imageWidth = " << width << std::endl;
	outFile << "const imageHeight = " << height << std::endl;
	outFile << "const imagefilePath = '" << (imagefilePath == nullptr ? "image.png" : imagefilePath) << "'" << std::endl;

	const char* fixedCode = ""
		"let checkboxStateMask = 0x1F;"
		"let pixelScale = 1;"
		"addCheckbox('R'); addCheckbox('G'); addCheckbox('B'); addCheckbox('A');"
		"addCheckbox('CheckerboardBG');"
		"addRange('PixelScale');"
		"addSaveButton();"
		""
		"const lineBreak = document.createElement('br');"
		"document.body.appendChild(lineBreak);"
		""
		"const imageCanvas = document.createElement('canvas');"
		"imageCanvas.width = imageWidth; imageCanvas.height = imageHeight;"
		""
		"const drawCanvas = document.createElement('canvas');"
		"document.body.appendChild(drawCanvas);"
		""
		"function setChannelImage() {"
		"    const tempPixels = new Uint8ClampedArray(pixels);"
		"    let r = checkboxStateMask & 1;"
		"    let g = (checkboxStateMask >> 1) & 1;"
		"    let b = (checkboxStateMask >> 2) & 1;"
		"    let a = (checkboxStateMask >> 3) & 1;"
		"    const checkAlpha = (checkboxStateMask & 0x0F) == 0x08;"
		"    let aOfs = a == 1 ? 0 : 255;"
		"    let rOfs = checkAlpha ? 255 : 0;"
		"    for (let i = 0; i < tempPixels.length; i += 4) {"
		"        tempPixels[i + 0] = Math.min(255, pixels[i + 0] * r + rOfs);"
		"        tempPixels[i + 1] = pixels[i + 1] * g;"
		"        tempPixels[i + 2] = pixels[i + 2] * b;"
		"        tempPixels[i + 3] = Math.min(255, pixels[i + 3] * a + aOfs);"
		"    }"
		"    const imageCtx = imageCanvas.getContext('2d');"
		"    imageCtx.putImageData(new ImageData(new Uint8ClampedArray(tempPixels), imageCanvas.width, imageCanvas.height), 0, 0);"
		"    drawCanvas.width = imageWidth * pixelScale; drawCanvas.height = imageHeight * pixelScale;"
		"    const drawCtx = drawCanvas.getContext('2d');"
		"    drawCtx.imageSmoothingEnabled = false;"
		"    if (checkboxStateMask & 0x10) { "
		"       let tileSize = 16 * pixelScale;"
		"       for (let y = 0; y < drawCanvas.height; y += tileSize) { for (let x = 0; x < drawCanvas.width; x += tileSize) {"
		"           const colIdx = (x / tileSize + y / tileSize) % 2;"
		"           drawCtx.fillStyle = colIdx ? \"#808080FF\" : \"#a0a0a0FF\";"
		"           drawCtx.fillRect(x, y, tileSize, tileSize);"
		"       }}"
		"    } else {"
		"       drawCtx.fillStyle = 'black';"
		"       drawCtx.fillRect(0, 0, drawCanvas.width, drawCanvas.height);"
		"    }"
		"    drawCtx.drawImage(imageCanvas, 0, 0, drawCanvas.width, drawCanvas.height);"
		"}"
		""
		"function checkState()"
		"{"
		"    function checkboxState(id) {"
		"        let chbox = document.getElementById(id);"
		"        return chbox ? chbox.checked ? 1 : 0 : 1;"
		"    }"
		"    function rangeState(id) {"
		"        let r = document.getElementById(id);"
		"        return r ? r.value : 1;"
		"    }"
		"    let newCheckboxStateMask = checkboxState('R') | checkboxState('G') << 1 | checkboxState('B') << 2 | checkboxState('A') << 3 | checkboxState('CheckerboardBG') << 4;"
		"    let newPixelScale = rangeState('PixelScale');"
		"    if (newCheckboxStateMask != checkboxStateMask || newPixelScale != pixelScale) {"
		"        checkboxStateMask = newCheckboxStateMask;"
		"        pixelScale = newPixelScale;"
		"        setChannelImage();"
		"    }"
		"}"
		""
		"function addCheckbox(id) {"
		"    const checkbox = document.createElement('input');"
		"    checkbox.type = 'checkbox';"
		"    checkbox.checked = true;"
		"    checkbox.id = id;"
		"    const label = document.createElement('label');"
		"    label.htmlFor = id;"
		"    label.textContent = id;"
		"    document.body.appendChild(checkbox);"
		"    document.body.appendChild(label);"
		"    checkbox.addEventListener('change', function() {checkState(); });"
		"}"
		"function addRange(id) {"
		"   const inputElm = document.createElement('input');"
		"   inputElm.type = 'range';"
		"   inputElm.min = 1;"
		"   inputElm.max = 8;"
		"   inputElm.value = 1;"
		"   inputElm.id = id;"
		"   const label = document.createElement('label');"
		"   label.htmlFor = id;"
		"   label.textContent = id;"
		"   document.body.appendChild(inputElm);"
		"   document.body.appendChild(label);"
		"   inputElm.addEventListener('input', function() {checkState(); });"
		"}"
		"function addSaveButton() {"
		"    const saveButton = document.createElement('button');"
		"    saveButton.textContent = 'Save Image';"
		"    saveButton.addEventListener('click', () => {"
		"      const imageDataURL = imageCanvas.toDataURL('image/png');"
		"	   const link = document.createElement('a');"
		"	   link.download = imagefilePath;"
		"	   link.href = imageDataURL;"
		"	   link.click();"
		"    });"
		"    document.body.appendChild(saveButton);"
		"};"
		"setChannelImage();"
		"";
	outFile << fixedCode << std::endl;

	outFile << "</script></body></html>" << std::endl;

	return true;
}
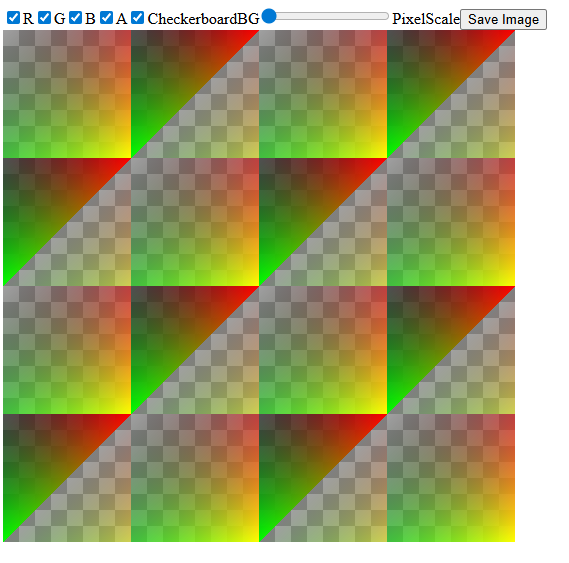
適当なサンプルの配列を、上記の関数で、HTMLに出力して、ブラウザで表示すると以下のようになります。
素っ気ないですが、とりあえずの確認であれば十分かと思います。
shikihuiku
リアルタイムレンダリングが好き